

Kieran Hopkinson relives his journey of tracking down Scotland’s largest, and most elusive mirror carp.
LEWIS READ TELLS YOU EVERYTHING YOU NEED TO KNOW ABOUT THE HINGED STIFF RIG, AND EXPLAINS EXACTLY HOW TO TIE IT.
Introduction
I sometimes ponder whether any rig since the original hair has had a similar impact as the Hinged Stiff Rig? Personally speaking, I very much doubt it…
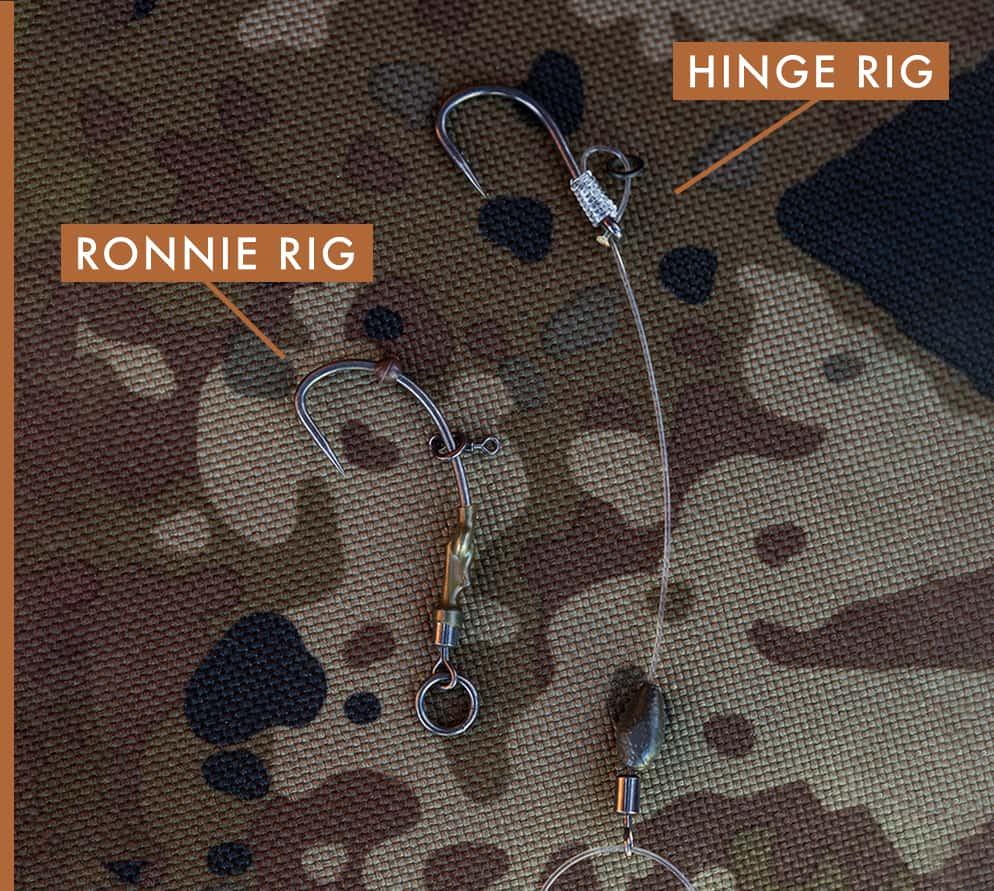
If the (big) carp in a water eat boilies, then this rig offers a pop-up presentation that is largely unequalled when it comes to presenting hookbaits 2 or 3 inches off the bottom. Whereas the Ronnie/Spinner, Multi and 360 are all exceptional low pop-up presentations, the Hinge – well that’s really something very special indeed, with all the key characteristics working truly synergistically in a way that exceeds any single part of the rigs design.
With the passage of time there have been numerous evolutions and ‘special’ variants – most of which still work well. How can they fail? The basis for the original concept remains so robust and effective that it takes a lot to cock it up! Luckily, there’s no way I can realistically cover all the ‘ground-breaking’ variants here either; all those versions that feature minor adaptations on how the hookbait is mounted or utilize different lengths or material for the boom. These adjustments are inconsequential in a broad overview of the rig. Instead, for this piece I will focus largely on the classic HSR and perhaps briefly mention the tried and tested options and when to use them.
Introduction
I sometimes ponder whether any rig since the original hair has had a similar impact as the Hinged Stiff Rig? Personally speaking, I very much doubt it…
If the (big) carp in a water eat boilies, then this rig offers a pop-up presentation that is largely unequalled when it comes to presenting hookbaits 2 or 3 inches off the bottom. Whereas the Ronnie/Spinner, Multi and 360 are all exceptional low pop-up presentations, the Hinge – well that’s really something very special indeed, with all the key characteristics working truly synergistically in a way that exceeds any single part of the rigs design.
With the passage of time there have been numerous evolutions and ‘special’ variants – most of which still work well. How can they fail? The basis for the original concept remains so robust and effective that it takes a lot to cock it up! Luckily, there’s no way I can realistically cover all the ‘ground-breaking’ variants here either; all those versions that feature minor adaptations on how the hookbait is mounted or utilize different lengths or material for the boom. These adjustments are inconsequential in a broad overview of the rig. Instead, for this piece I will focus largely on the classic HSR and perhaps briefly mention the tried and tested options and when to use them.


Revolutionary
Yes, I admit that I used a truly awful word in the first paragraph – one that is right up there with the most bull-shitty words in the English language, but synergistic is the only single word I know that entirely describes how the key characteristics work together so perfectly. *‘Harmoniously’ comes close but is less prescriptive of a rig's mechanics than it is a 90’s brand of hair spray.
The manner in which the D-mounted hook pivots and presents the point onto the bottom lip, the way the hook section rotates, the manner in which balanced rig can lift with free movement (especially when afforded free movement by looped booms) without having excessive slack and how the rig as a whole id tangle free and resets makes it almost perfect! Can you tell that I’m a big fan yet?!
The hook section itself, to my mind, offers the perfect balance between refinement and the crudity dictated by use of high memory stiff materials like Recoil. Using a good quality cork balled pop-up, that is so vital for the mechanics of the rig, means that you are able to balance the sink rate of the hook section whilst ensuring the hook section sits upright for the full duration of time that the hookbait is in out there fishing.
At risk of repeating myself ad nauseum, if you use standard shop bought pop-ups with the classic hinged rig, or on a Choddy, the hook section will not function properly because it will end up leaning over – stopping it from rotating freely which will cause poor hook holds and inevitable hook pulls.
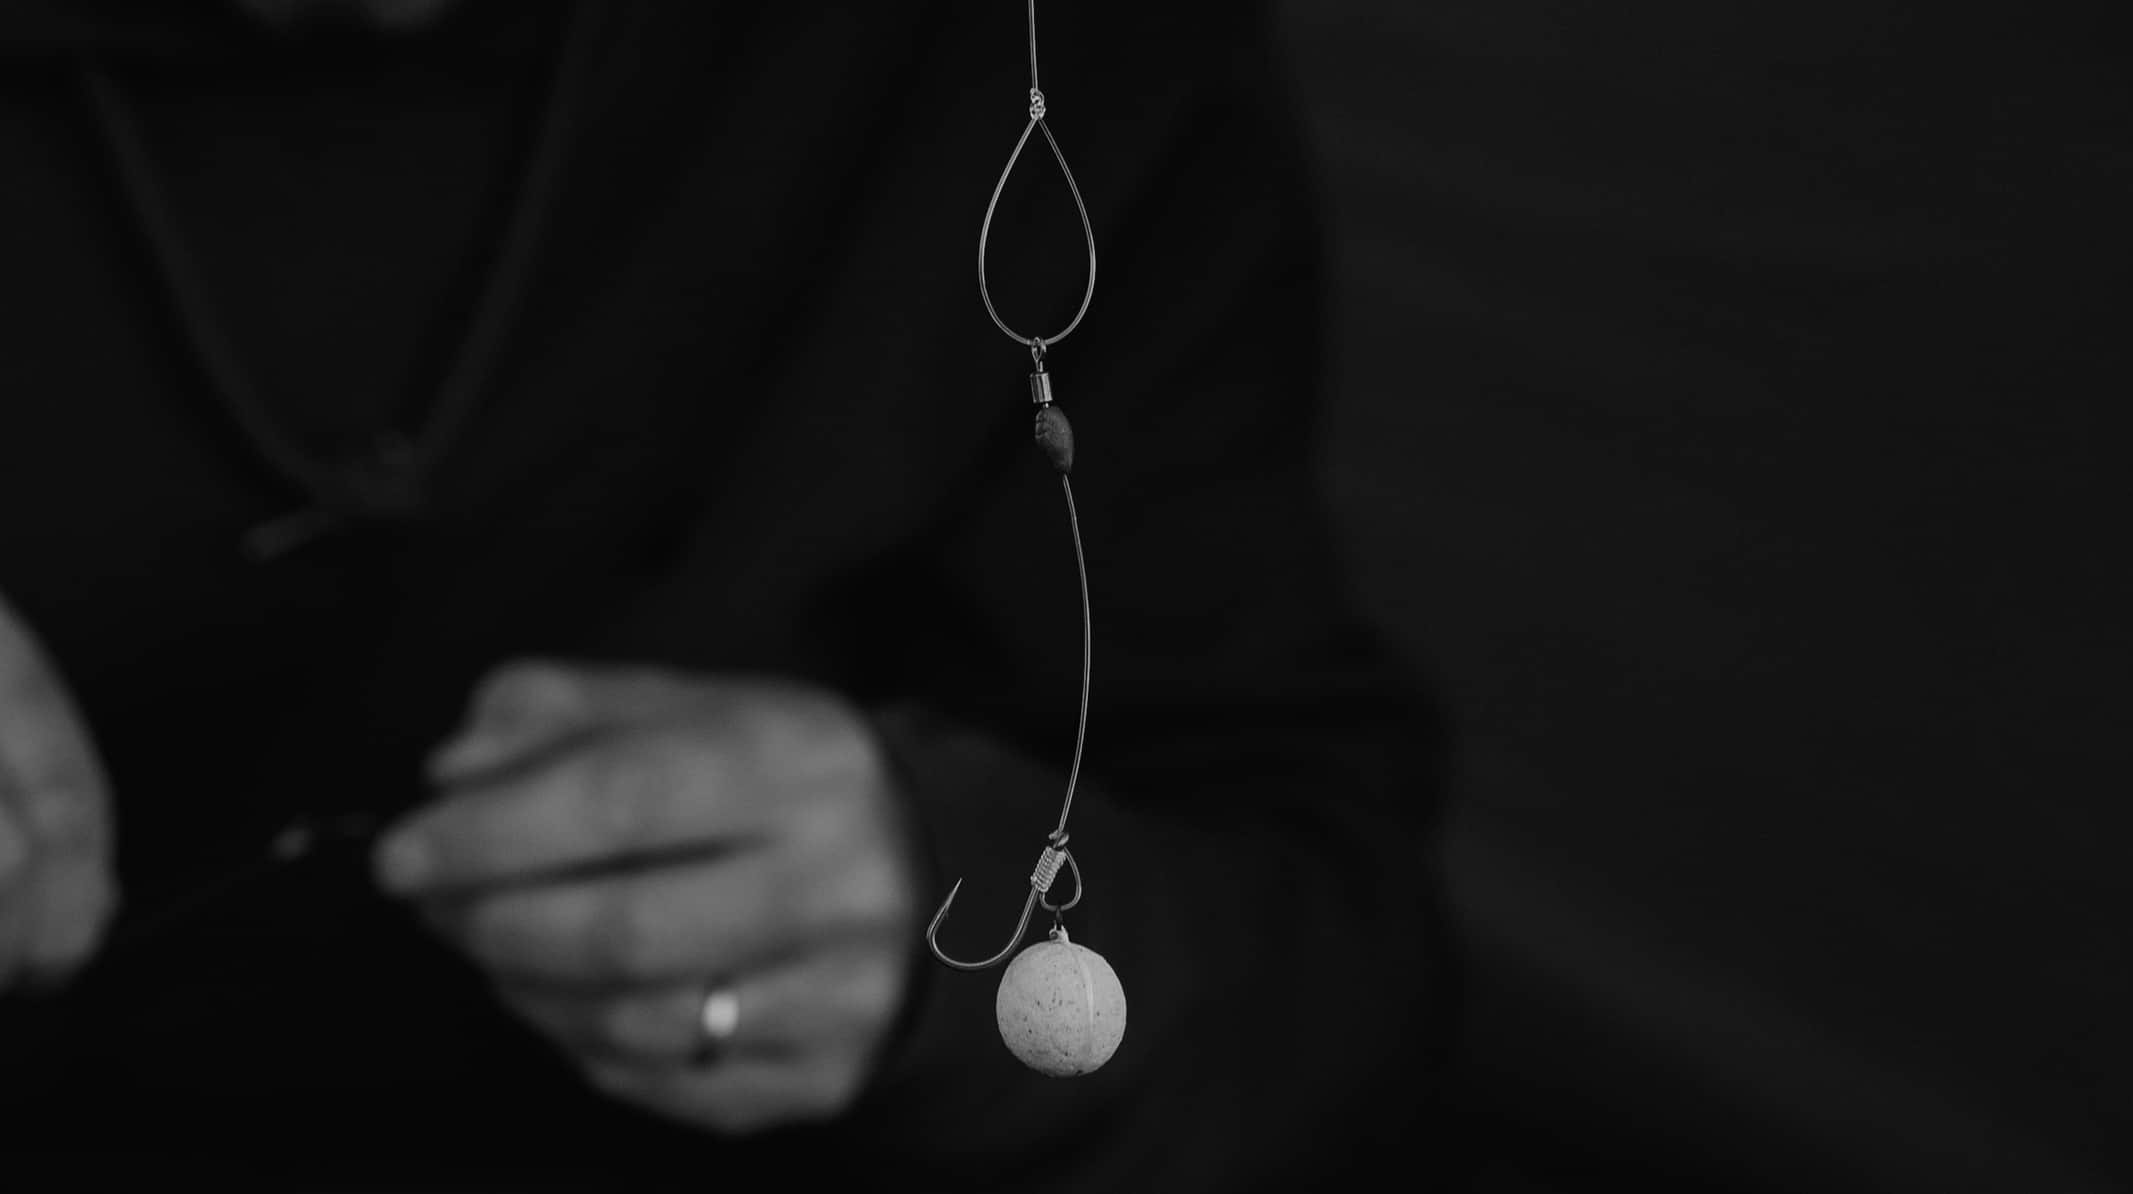
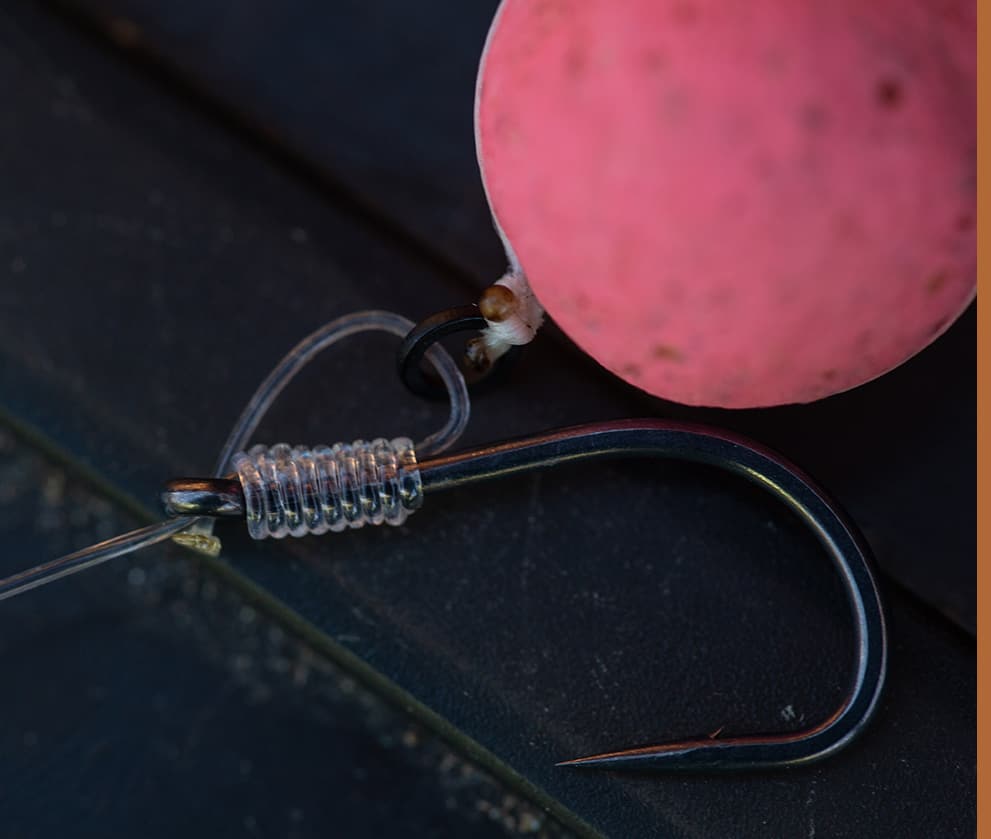
TYING YOUR CORKBALL POP-UP
TO A RIG RING
TYING YOUR CORKBALL POP-UP TO A RIG RING
Over the years I have experimented using hinge points at the bottom of the hook section (top of the hook section swivel) and have found that with standard HSR heights a rigid connection, created by a simple blobbed blood is most consistent – but when going lower or using a more curved hook section, the additional movement seems to allow it to still work very effectively indeed.
Whilst on the topic of knotting the hook section to the swivel, I must mention one other little tweak I invariably apply to the luscious, gently curved, hook section; that is to manipulate the angle that the line exits the knot at a slight angle, so the hook point sits in near perfect alignment with the rotational axis of the PTFE swivel. These may seem like small details, but anything that you can do to ensure the hook section rotates freely on that access will unequivocally be a good thing…
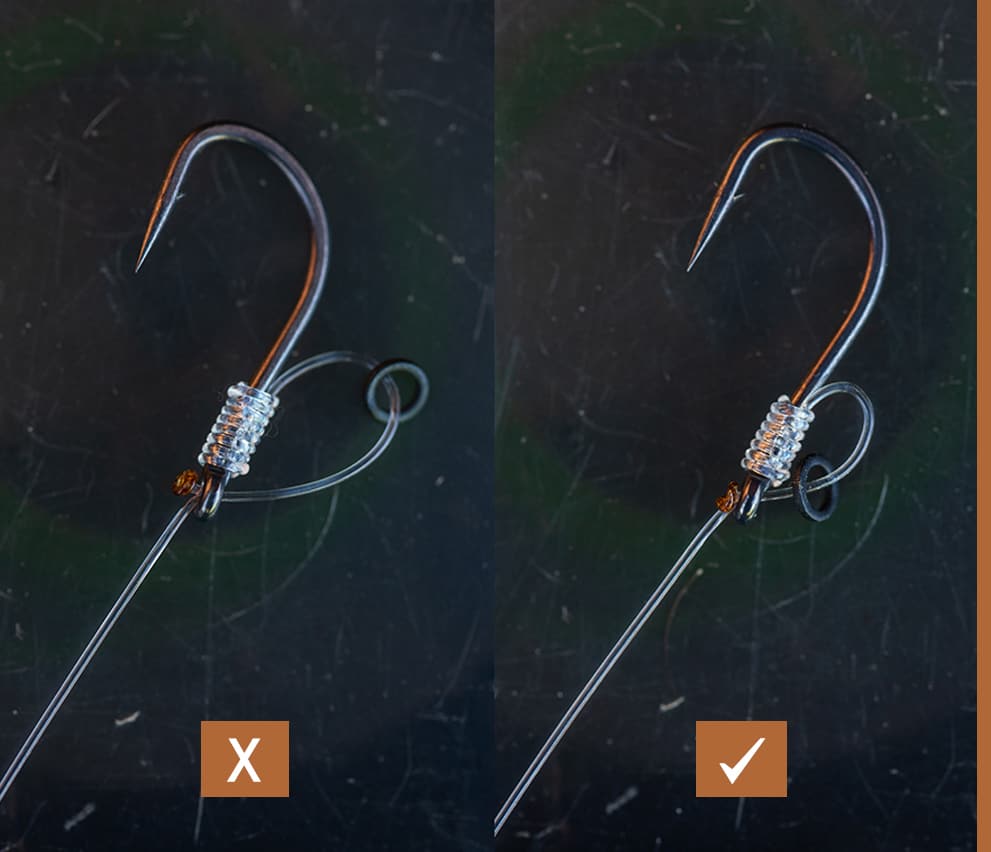
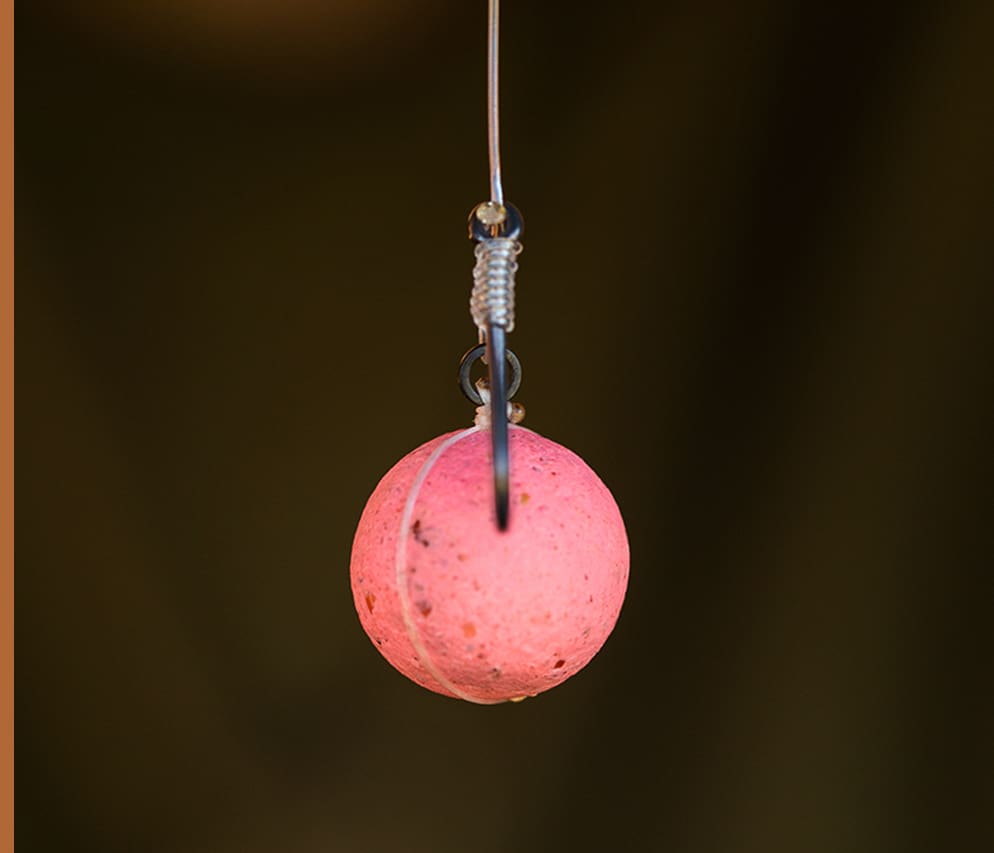
I’ve seen some hideous examples of curved hook sections… some clawed right over! The classic presentation features a lovely, natural-flowing sweep, which when combined with a tidy (small) tear-dropped ‘D’ on the back of the hook, sees the hook sit up proudly. This is an important consideration. Whilst the D-Rig can benefit from a slightly larger D to aid separation, large D’s on pop-up rigs end up looking horrendous, the hook being extremely obvious as it hangs from the bottom.
I still prefer tying hooks on with the (tricky to tie) Domhof whipping knot because the stiff Recoil exits the hook straight when it is bedded down nicely. In reality the Domhof can be a total nightmare to learn, and truthfully the knotless knot is arguably stronger. As long as you counter the angle the hooklink leaves the eye with the knotless, by straightening it with the tag that forms the D then the difference is only very slight. Oh, and please don’t forget to make sure your D is perpendicular with the hook, and the hook section is in perfect alignment with the hook shank.
The Neat way to
Mould Putty
The Neat way to Mould Putty

Decisions on boom/hooklink type, inevitably impact on choice of lead arrangement and are dictated by substrate characteristics and the presence of weed. If there is low weed, I’ll happily fish a lead clip with a long soft boom, tied with either our lovely Tungskin or Camsoft coated hooklinks, and tied ‘metal Micky’ style using Ring Swivels instead of loops - making it all very easy.
If the rigs are being cast onto clear spots/lakebed then its heli’s all the way for me! When tied properly, with lovely looped heavy monofilament (Fluorocarbon or copolymer) booms, the rig truly comes into its own… Loops with plain swivels means there’s plenty of movement and no jangling of unnecessary rings. Rings on loops just makes no sense in my head and creates more problems (tangles) than it solves.
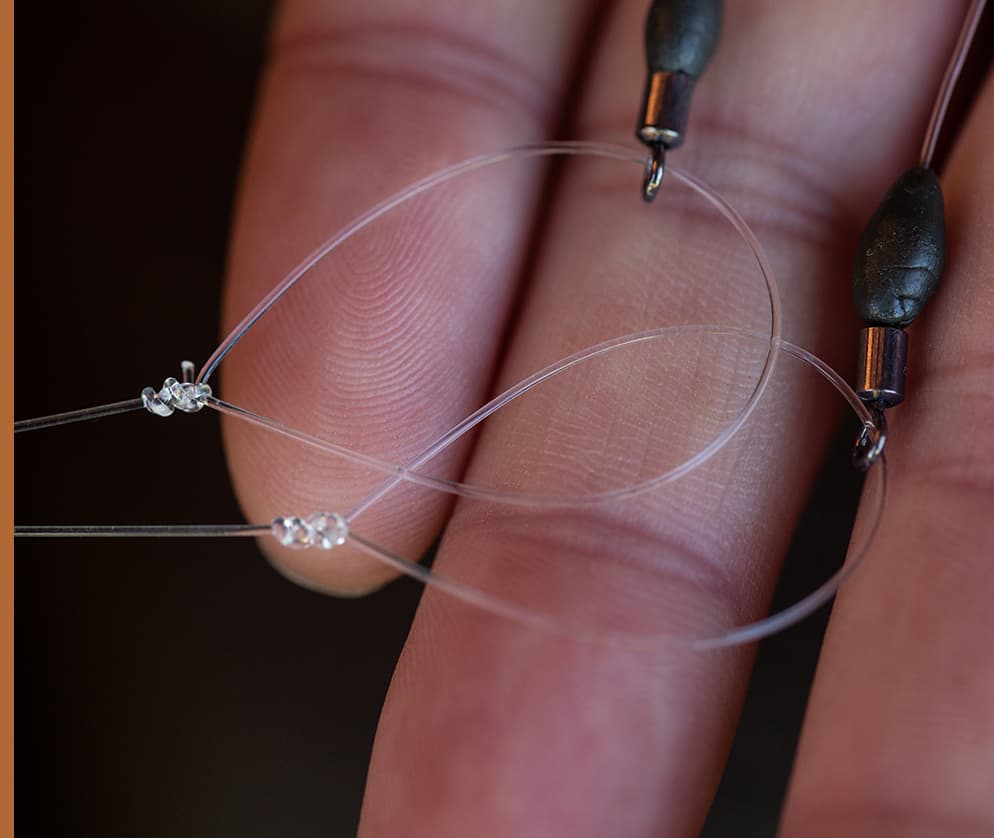
For me, the ideal loop at the hook section is about ¾ inch (that’s 2cm for the nippers) and formed using the wonderfully named ‘Improved Rapala Loop knot’. Look it up on the good old interweb, as there are loads of instruction videos and step by steps that will help you learn how to tie it. If I’m being honest, I tend to just tie a Fig.8 loop at the lead end of the boom – unless I’m expecting rig inspection by someone really important that is…
Keep those hooks sharp, hookbait buoyant and the rigs tidy and this is one rig that will not let you down when the chips are down. God’s rig – it’s the dog’s doodahs!
Macro Rig Inspection
Macro Rig Inspection
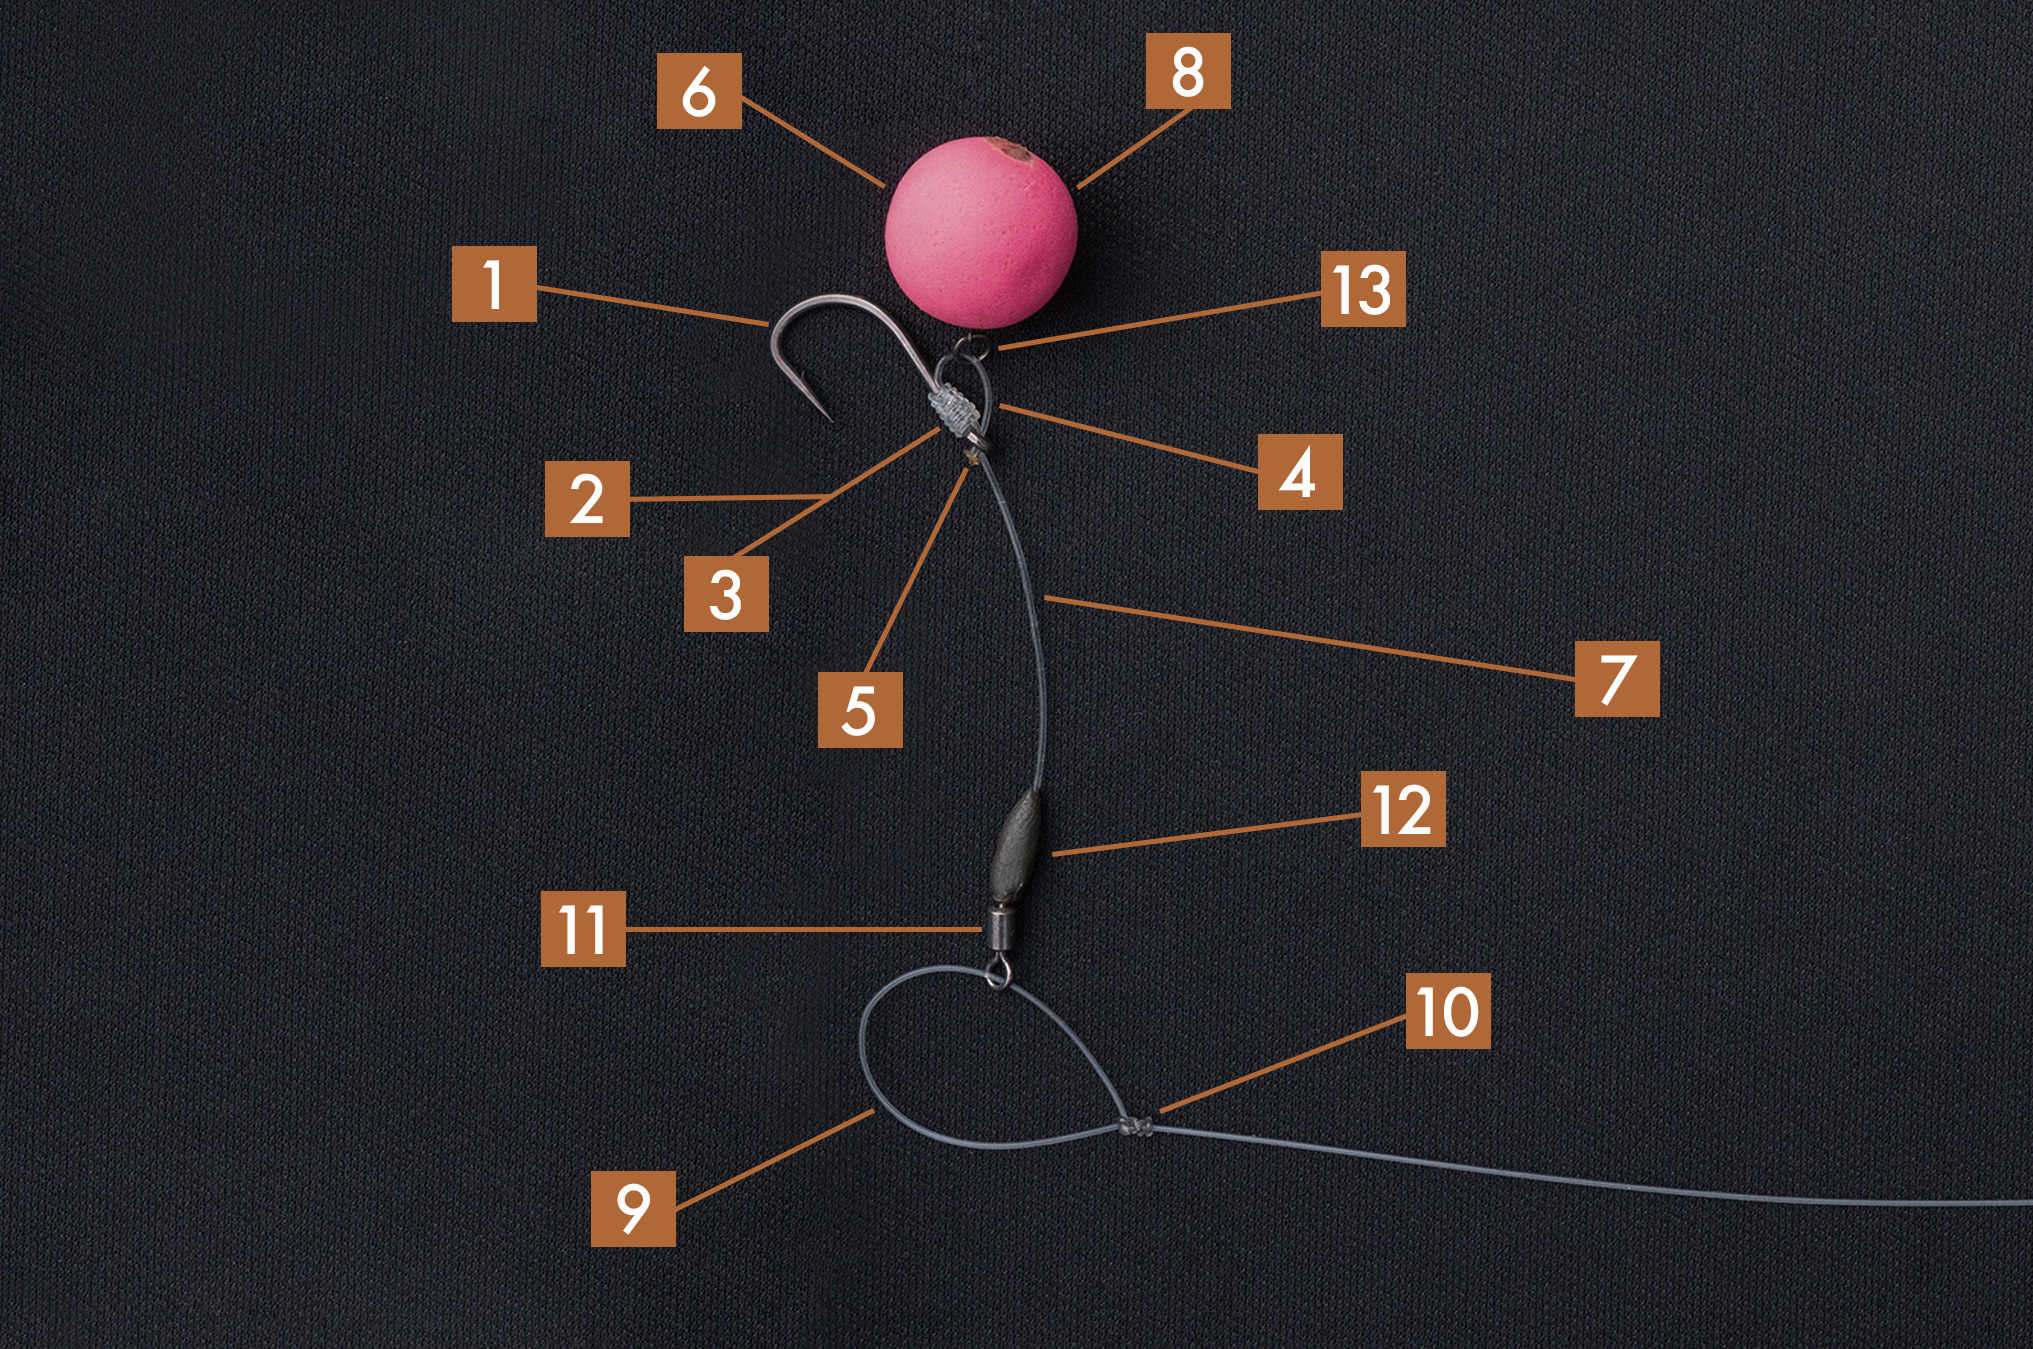
1.The Right Hook
Realistically, we’re talking straight or out-turned eye patterns here. Points can be straight point (TA Out-Turned Eye) or beaked (TA Beaked Chod) – use whichever you prefer, just make sure it’s as sharp as it can be.
2.Which knot's the right hook knot?
The Domhoff (and Snell) ensure the hook link exits the hook eye straight, keeping the hook point and hooklink in perfect alignment. The Knotless knot offers reliable strength and is a piece of cake to tie. Just make sure you correct the hook section by straightening it with the tag end of the D, so the hook sits straight…
3.How many turns?
This depends on the diameter of the materials and the hook size. The easiest way to determine the number of turns would be by relating it to the position of the hook point. Finish there! That’s usually 7-8 turns.
4.D Size and shape?
Pop-up rigs require a tear drop shaped small loop, that naturally keeps the hook and hookbait in close proximity to one another, so tidy 4mm loops are lovely – not forgetting to make sure that the front edge of the loop is rounded, and the loop sits perpendicular to the hook shank.
5.Blobbing
When blobbing back the D be careful not heat the knot. Simply mask the knot and hooklink with your fingernail.
6.Pop-up Height
This is a rig that works best with pop ups fished at between 1.75 and 2.5 inches in height. Any higher or lower and you risk hook pulls. *Measurement taken from the bottom of the swivel on hook section, up to the top of the hook.
7.Curvaceous
As the pop-up hook section increases in length the curve needs to be made less curved – just gently sweeping to maintain rig efficiency, and vice versa. A short pop-up section can be very curved.
8.Hookbait buoyancy
(ULTRA IMPORTANT) If your hookbaits lose buoyancy over time when immersed, then you need to use cork-balled versions. As soon as the hook section leans over it undermines the rigs capacity to rotate.
9.Hookbait buoyancy
There isn’t a right or wrong, as we all have favourites. Keep things simple and strong, so ‘Metal Micky’ rigs are just strong coated hooklinks tied to ring swivels for movement. Booms need to be strong – and choose a mono material that suits your needs (copolymer or fluorocarbon). Big fish equals big loops for hookbait movement… just enough but not too much.
10.Loop Knots
Always think strong and functional. I recommend the Improved Rapala loop knot for strong Fluoro (approx. 0.50mm) to offer exquisite, shaped loops of consistent size. Look online for ‘how too’ info.
11.Swivels
There’s no need to have loops and ring swivels with looped booms (likewise there won’t be a negative impact except lots of jingly metal pieces) – just a rolling swivel at the base of the hook section is all that’s required, attaching the hooklink to the terminal in your preferred method. Mine is a loop onto a Quick Link style swivel.
12.Balancing
Not too fast and not to slow (as the actress said to the bishop) – how do you define that!? So that it settles slowly, not hovering almost neutrally balanced mid-water, and certainly not sinking quickly. A tear-dropped section of Rig Putty molded over the top eye of the swivel and adjusted to tune the sink rate is perfect.
13.Hookbait attachment
As we’re mostly using cork-balled hookbaits, these can be tied on with Bait Floss or Hook Ring Swivel Screws, whichever you prefer.